Friday, February 22, 2013

My first risotto!

I enjoy watching cooking shows (are you really surprised?), and I've noticed risotto comes up with some frequency.  But, until I made it myself a few days ago, I had never eaten risotto myself.  I think that's part of the reason I had it set up in my mind as a challenging dish.  That, and you NEED arborio rice.  According to wikipedia (I started my search for what, exactly, risotto is supposed to be there), you can use some other types of rice, but they're difficult to come by, and arborio gives satisfactory results anyway.


Risotto recipes are easy to find-- google it, or open an italian cookbook (not all will have risotto, but many do).  Even the bag of rice I bought had a basic risotto recipe printed on it.  Generally, a risotto is made by sautéing some onions, toasting the rice, adding some wine, then gradually adding hot broth while stirring, stirring, and stirring.  The stirring is key, and my copy of Modernist Cuisine at Home (I freely admit to name-dropping) tells us why: what makes risotto so wonderfully creamy is starch.  Arborio rice (and others suitable for risotto) are especially high in amylopectin, a type of starch.  Amylopectin is the branched starch that
your body easily breaks down (think of the starch molecule as a stick you 10 other people want to break into toothpicks.  The more branches it has, the more places there are for you to grab on and start breaking.)  The problem is that starch is kept inside the cell (you know, where the plant can use it).  When you expose the rice to hot liquids, some of the starch can be released, but the majority of it is released by mechanically whacking those cell walls--by stirring.  So the more you stir, the more cells walls are broken, and the more walls are broken, the more starch you set free, and the creamier your risotto becomes.

I used another recipe from Rachael Ray's Big Orange Book, mostly because I had wanted to try it for a long time, but also because I had leftover beets hanging out in my kitchen: Beet Risotto.

1) Heat an oven to 400 degrees (Fahrenheit).  Place 4 medium beets, scrubbed and with the ends trimmed, on a large piece of aluminum foil.  Drizzle oil over the beets, and season with salt and pepper. Fold up the foil and place it in the oven, roasting the beets for about 45 minutes until they are tender.  (You could also do this on a grill, if you prefer, or even a campfire, though I don't know why you would.  It just occurred to me that I've cooked veggies over a fire this way before.)  Once the beets are soft, let them cool, then throw them in the food processor/ blender and puree them.  Do be careful.  It will stain.

2) In the meantime, heat up 4 cups vegetable stock with 2 cups of water added-- bring it to a boil, then just keep it warm.

Toasting the rice.   Note: this pan was NOT big enough to finish the recipe.
3) Sauté 1 chopped onion and 2 minced cloves of garlic in 2 Tbsp oil and 1 Tbsp butter (I imagine the butter is for flavor-- I certainly love the flavor it gives!) in a LARGE saucepan over medium-high heat.  When the onion is tender (I went until it was slightly caramelized), add 2 cups arborio rice, and toast it while stirring for about 2 minutes.  Add 1/2 cup dry white wine, and cook about 1 minute until the liquid has been absorbed.  Now start adding the hot stock, a ladle or 2 at a time, stirring constantly and vigorously until each addition has been absorbed.  When you're done with the stock, add the beat puree and season with salt and pepper.  The risotto should be creamy, but the rice should also still have a firm texture.  The recipe says it's shouldn't take much more than 18 minutes. (Mine took a bit longer, but not much.)  Stir in 1/2 cup Parmigiano-Reggiano, and check flavors again.

4) Serve topped with extra Parmigiano and/or feta.  Rachael Ray serves it over the greens from the beets, but my beets were old and didn't have nice greens.  I would have used spinach, if I had some, or possibly kale, which I've never eaten but would look pretty. (dark red, dark green...)

Rachael says it makes 4 servings.  My family of 5 was given about half of what was made, and thought it was an awful lot.

Tuesday, February 19, 2013

Some Abstract Musings... And Easy Veggie Soup

Due to the fact that I ran an 8-mile race yesterday, I didn't plan anything really blog-worthy.  I just made soup.  We'll get to that in a moment.  But I wanted to talk about recipes in general first.

My mom accused me of being close to having more recipes than I could possibly make.  She may be right. (Let's hope not.)  But it raised an interesting question in my mind.  Is the sole purpose of a recipe to tell us how to make a dish?  I don't think so.  In fact, I have some recipes I'm pretty sure I'll never make, such as a recipe for pork cake.  (Because breakfast should be a meaty, coffee-containing fruitcake.)  It's from a cookbook published in the 1920s, and shares a page with recipes I actually would eat.  But more to the point, I think it's interesting.  It tells me a bit more about what people were eating and how they were cooking a little less than a century ago.  This same cookbook also has a section of tips for stain removing, pain relieving, etc. and a chart for converting cooking using a wood-fired stove/oven to cooking using a swanky new gas-burning one.  Nifty, right?


Even if you don't care for the historical or cultural insights recipes may provide, they can also provide more practical information beyond making pork cake for breakfast.  From that recipe, I might choose to pair coffee and pork together in a recipe of my own devising (perhaps a coffee marinade?), or any of the other ingredients.  A recipe may also have a novel cooking approach (bagels, for example, are boiled prior to baking, which gives them their chewy texture; would I have thought of that?  Can I use it for something else?)  Perhaps a recipe features an ingredient you don't care for-- can you alter it to create something you'll love?  Maybe a recipe just gives you an "aha!" moment, and your mind runs to something new and wonderful.  (My first encounter with puff pastry was a recipe I didn't bother to save, but I've had some great times with puff pastry since then.)

Now, the soup:

Soup doesn't have to be ridiculously simple, but it can be.  Which is one of the great things about it.  Other great things: you can use even more things in soup that you can in stir-fry (I'm trying to think of something I can't use in soup... well, I guess cookies, etc. would be stretching things), soup is multi-cultural, soup is homey.  It can be a hearty meal to itself, or it can be a light starter.

Easy Veggie Soup-- Throw everything in a pot (or slow-cooker) with water.  Simmer until you are ready to eat it.


In slightly more detail-- I chopped some onions, minced some garlic, and sautéed those.  While doing that, I chopped up some carrots, celery, and broccoli.  Those got added along with frozen corn, canned beans, and canned tomatoes.  The tomatoes are my favorite thing to add to veggie soup.  Don't bother to drain the canned items.  Add water, and noodles if you like (I used Ditalini).  Season to taste with salt, pepper, herbs, and/or spices.  I used Italian seasoning, a bay leaf, tabasco sauce, pepper, and Lowry's seasoned salt (as well as regular salt).  I also added some sweet vermouth to give the flavor more depth.

Tuesday, February 12, 2013

Saucy Stir-Fry

One of my favorite things to make is stir-fry.  It's quick, it's easy, it uses whatever you have in the kitchen (within reason)... What's not to love?  So here's a variation I came up that uses peanut butter and orange marmalade to create a rich, flavorful sauce.  My roommate said it reminded her a bit of orange chicken.

A quick note before we get started.  I am terrible about measuring things (unless I'm baking).  It's funny, because people like that really used to drive me nuts (How do you know how much to add?)  In an effort to avoid those frustrations, I'm putting down approximations.  Adjust them according to taste-- they're pretty flexible.  Also, this particular write-up should easily serve 6 people.

Meet the Cast!
I use chicken breasts for this recipe, and an assortment of veggies.  Onion, carrot and celery are my favorites-- I usually have them in the house because they're useful for all sorts of things!  I used about 4 carrots (cut them into 3/4 inch chunks) and 3 celery sticks (roughly chopped), and probably about 1 1/4 cups of onion (measured after being chopped).  I had 3 large chicken breasts tonight, and cut them across the grain (the short way) into 1/2 inch-thick strips.  I also had 2 large mushrooms which I halved and sliced.

In a large pan (or wok), saute onions and 2 Tbsp minced garlic in oil until the onions are transparent (maybe 5 minutes over medium-high heat), then add the chicken.  Stir-fry until the chicken is no longer pink. (Because there will be further cooking, you can get away with color change observation rather than temperature-checking.)

Add the carrots next, because they are the most heat-tolerant.  Use this time to prep your sauce. 

 It's not going to be the most beautiful thing you've ever laid eyes on-- you're combining things that, due to their chemical make-up, aren't going to mix.  Combine about 3/4 cup of peanut butter (chunky or smooth-- it doesn't matter), 1 cup orange marmalade, 1/2 cup soy sauce, and pepper to taste.  You can also add 1 tsp fish sauce if you have it to give the sauce a little more umami flavor (often described as meatiness).  If you don't have fish sauce, it really isn't necessary. Feel free also to add 2 tsp ground ginger if you have it.
The carrots have now been in the pan for a minute or two, so go ahead and add the celery, then the mushrooms.  (Just keep stirring everything-- there's a reason it's called stir-fry.) If you like, add 1 cup cashews or peanuts, too.  Add the sauce, and let it simmer and thicken.  TASTE TEST IT.  If you want more of a certain flavor, add it.  This would also be the point, if you wanted, to add frozen veggies (I wanted to add green beans, but we were out).


As soon as your sauce has thickened to the consistency you want, you're good to serve.  You can expedite the thickening by adding corn starch dissolved in a bit of cold water.  (Don't skip the dissolving step, or you get this horrible gritty texture.)  You can eat this on its own, if you like, but I prefer it served with rice.


Monday, February 11, 2013

Rachael Ray's Indian Spiced Beef...

I don't know if other families do this, but my family has the tendency to look at each other in the morning and say, "Gosh, what are we going to have for dinner?"  We then root around in the freezer to see what kind of meat we have, and check the pantry to see what we could serve with it, and come up with something.  I can't help thinking it's terribly inefficient.  But it works for us.

This time, we pulled out sirloin steaks, and on a whim I grabbed my copy of Rachael Ray's Big Orange Book.  I'd like to, if you'll bear with me, briefly say that I really like this book.  Rachael Ray uses a variety of flavors, most of what she makes is quick and simple, and this particular book includes a selection of vegetarian and kosher foods (you have no idea how important these are until you cook for a group that includes someone on a limited/restricted diet) as well as recipes designed for 1 person (which I personally find invaluable-- I get tired of leftovers, eggs, and pasta when cooking for myself).  If you don't have time to plan out a meal, this is a great book-- it's all right there for you.

So, flipping through, I came across "Indian Spiced Beef and Warm Curry Potato Salad, Tangy 'Creamed' Spinach".  After checking that everyone was on board, we went for it.

Here's more or less how it goes, starting with the potato salad.
1) Boil the potatoes.  There are a couple ways to do this.  Personally, I like to cook them whole with the skin on (cooked potato skin slips right off), which means I'm losing almost no potato (although the loss due to peeling is probably negligible) and can give the potatoes a slightly different flavor.  The problem with this method is that it takes a long time, so it only works well for small potatoes.  It's faster and more convenient to peel and chop potatoes before boiling them, especially if using larger ones (like Rachael's recipe calls for).  And ALWAYS put salt in the water.  Potatoes love salt.


2) Saute some onions and garlic, then add chickpeas, chicken broth and curry paste to make a sauce.  [The recipe in the book also calls for bell peppers and mango chutney, but I skipped those because of taste preferences in my family.]  I let this cook down a bit before adding the potatoes.  Let it sit for a bit so those potatoes can soak up all the yummy curry flavor, add some snipped green onions, and you've got a different potato salad.

Notes: I like a bit of tang to my potato salad.  I might try adding rice wine vinegar or something next time.  The mango chutney may have provided some tangy-ness, but I really struggle with savory fruit items.  The flavors don't work for me.

Follow-up Note: I went ahead and added some vinegar to my leftover potato salad.  It definitely provided the flavor I was looking for.  Next time, I'll add maybe 1/8 cup (start with less, you can always add more) rice vinegar to the sauce.


Spinach
1) Thaw some frozen chopped spinach and wring it out.
2) Sweat some onions in a pan (basically, give them some light cooking, but don't let them brown.  You're decreasing how pungent their flavor is without introducing caramelized flavors), add the spinach and a cup of plain Greek-style yogurt.  Adjust the flavor with salt and pepper.  Warm it up, serve it up.

Notes: Rachael lost me a little on this one.  Her recipe states to "let it simmer" for 5 minutes. Simmer generally means a certain amount of liquid.  My guess is that my yogurt is way thicker than hers (because to me, Greek-style means I can eat it with a fork) or that I wrong my spinach too dry.  I thinned it a little with milk, and just kept it over low heat so it was warm.

Meat
1) Mix 1 Tbsp each of Cumin, Coriander, Turmeric, Allspice, Paprika and Grill Seasoning. Rub it on the meat and let it sit for about 15 minutes.
2) Cook the meat.  Let it rest before you slice it so that the juices stay in the meat rather than leaking all over your cutting board.
Notes:  We grilled our meat; the recipe says to use a pan.  Basically, cook it in a way that's convenient and effective.  Also, if you realize a bit late in the game that you don't have grill seasoning (oops), you can fudge it with salt, pepper, and onion and garlic powder.  (Most grill seasonings are going to have some variation of those).


Tuesday, February 5, 2013

Asparagus-stuffed Chicken

Well, I had been planning on making chicken meatballs, but we had asparagus in our fridge from a dinner that fell through.  I really hate it when asparagus goes bad, so I decided to come up with an entree that would go well with asparagus.  My first thought was chicken Cordon Bleu, but that wasn't quite what I wanted.  However, it provided excellent inspiration.  (If you're unfamiliar with chicken Cordon Bleu, here's a recipe from BHG.)  I decided I was going to stuff chicken with asparagus and cheese and give it a nice crumb coating.


 I decided to use chicken thighs rather than breasts, because I was able to find a package of just the right number of appropriately-sized thighs, and they're generally a bit cheaper than breasts.  This is because they're a bit less desirable.  They're dark meat (chickens use their legs!), and tend to need more cleaning up than breasts.  There's fat and connective tissue, and more than one muscle (and a bone, but I'd gotten  boneless).  I decided to stuff with mushrooms and cottage cheese as well as asparagus.  The choice of cottage cheese was largely for texture.  I wanted something creamy but not necessarily smooth.  Ricotta would have been a good substitute, or goat cheese, if you like the flavor (I do, but others in my family don't).

 To make the Filling:  Chop a couple sprigs of asparagus.  Discard the woody ends.  Place them in a small microwaveable bowl, and place that bowl in a larger microwaveable bowl with an inch or so of water.  Microwave for about 1 minute.  Mince about 8 brown mushrooms and place in a large pan with a bit of olive oil.  (Use a large pan to avoid crowding the mushrooms-- it gives better flavor.)  Saute about 5 minutes, until the mushrooms are cooked down and slightly browned.  Combine asparagus, mushrooms, and 1 cup cottage cheese.  Add pepper to taste.


Trim fat, etc. from 5 boneless chicken thighs (as much as possible), and place a large spoonful of filling inside each thigh, folding the meat over.  Avoid touching the spoon to the meat, so the filling will remain uncontaminated, and do not place excess filling from the chicken back into the bowl.

 Dredging!  I LOVE dredging.  It's one of the simplest ways to prepare meat for in-house cooking, and you can easily change up what flavors you incorporate.  Expect to see frequent dredging on this blog.  For this recipe, I kept it fairly classic-- flour with salt and pepper for the first dredge; 2 eggs for the second; and plain bread crumbs, salt, pepper, garlic powder, and paprika for the third dredge.

Carefully (so as not to dump the filling) drag the stuffed thighs through each of the dredges.  I found this easiest if I grasped the edges next to the filling.

Heat 2 Tbsp oil over medium heat in a large pan.  Add the coated chicken breasts, and cover the pan to keep heat in.  Cook about 10 minutes, until the lower layer of thigh is no longer pink.  (Color isn't necessarily a reliable indicator, but we'll get to that in a moment.)  Flip the thighs and re-cover.
 Cook about 10 minutes more, until a probe thermometer inserted in the folded-over part of the thigh reads 165 F (the minimum safe temperature for poultry).  Be sure to check the center where the filling is, too.  This recipe, unfortunately, has a HUGE potential for cross-contamination if the proper temperature is not reached, because it places raw meat in contact with vegetables and cheese that may not get as well-cooked.  So, measure the filling temperature and the part of the meat that has no direct contact with the pan to be safe.  Seriously, a probe thermometer is a great investment.  Mine cost about $10, so it's not a huge set-back, and it is extremely useful.

 Steam the remaining asparagus.  Once again, be sure to remove the woody ends.  I just whack of a bit with a knife.  My mom is a proponent of snapping the sprigs, so you can be sure exactly where the woodiness ends.  My way is faster, but less precise.  Now, you can buy special asparagus pots.  I have never gotten one.  I don't eat asparagus that often.  Proponents of these pots could probably explain to you exactly what benefit there is to steaming asparagus that are being held upright.  I don't see it.  I've been known to just throw asparagus in a pot with nothing but an inch of water.  This time I actually dug out a steamer basket. Bring about an inch of water to boil, put in the basket, and then the asparagus, and give it maybe 2 minutes to steam.  You know it's done when it takes on a very bright green color.

I served the asparagus and chicken topped with hollandaise sauce (Knorr sells it packets!) and left-over filling.  Pretty tasty!

Sunday, February 3, 2013

Chickpea Burgers

I have a collection of recipes.  Right now there are 1250 of them.  Not counting my cookbooks.  Or pinterest.  That's part of why I'm doing this blog.

One of the recipes I've had for a while is a recipe for chickpea burgers that someone photocopied from a magazine and mailed to me.  I figured, why not?  I love chickpeas, and the spices listed amounted to wonderful Mediterranean/ Mid-eastern flavor.  Plus, super-healthy!  Chickpeas are a great source of vegetarian protein as well as fiber.

So, the recipe (as I followed it):
     Combine 1 15-oz can of chickpeas (drained, rinsed, and mixed with a "spritz of lemon juice and a pinch of sea salt), 1/2 teaspoon (tsp) seasalt, 1/2 tsp ground turmeric, 1/2 tsp paprika, 1/4 tsp cumin, 1/4 tsp coriander, 1/8 tsp cinnamon, 2 tsp minced garlic, 1 tsp minced fresh ginger, 3 Tablespoons (Tbsp) olive oil, and 2 Tbsp lemon juice in a food processor and process until smooth, scraping sides occasionally.
     A couple quick notes:  I probably used more coriander than called for-- I was almost out of it, and I know I like the flavor of coriander, so I just dumped in what I had.  Also, mince the garlic.  I was a bit slip-shod about that, because I was like, "I'm about to put this in a food processor!  How small does it need to be?"  Well, small pieces of garlic aren't necessarily going to be caught by the blade, no matter how long you process.  So I had some chunks of garlic.  Not the end of the world, but a potentially nasty surprise to people who aren't as wild about garlic as my family.  Also, at this point, you have a pretty delicious hummus.  

     Transfer the mixture to a bowl and stir in 2 1/2 cups cooked rice, and 1/4 cup loosely packed fresh parsley, minced.
     I used brown jasmine rice, because I had that in my pantry.  The recipe called for brown Basmati rice.  Both of those are a relatively thin-grain.  The photo above is the parsley being snipped in.

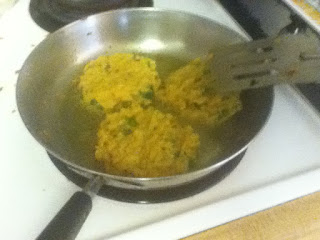
     Moisten your hands to keep the mixture from sticking , then shape into patties.  Placed them onto a baking sheet lined with parchment paper, and bake them at 375 F for 22 to 25 minutes until the patties start to get dry and crisp on the outside.  They'll firm up as they cool.  Alternately, you can created a crispier version by heating oil in a skillet over medium heat and cooking the patties about 3 minutes per side until golden brown.
      I tried the pan method, but had a lot of trouble keeping the patties intact.  I think this was my fault, for being impatient (my rice had taken way longer to cook than it was supposed to, so I was rushing to make up for lost time-- DOESN'T WORK THAT WAY).  The patties turned out better when I slowed down and gave them time to brown.  Also, the moist hands idea didn't seem to make much of a difference.  
The finished burgers turned out wonderfully flavorful.  I served them along with Dolmathes (those stuffed grape-leaves that Greece is famous for).  Some of my family went ahead and dressed the burgers the way they would a regular burger-- mayo, ketchup, etc.  I just ate mine plain.

Friday, February 1, 2013

Happy (belated) Birthday, Pride and Prejudice

I got really excited about the 200th birthday of Pride and Prejudice.  It was in the news, and all over facebook, and I decided I wanted to do something to celebrate.  And how do we usually celebrate birthdays?  With cake!

I  started by looking through my copy of Better Homes and Gardens Cookbook.  When in doubt, BHG is the first place I turn-- either their website or the book.  I settled on Citrus Yellow Cake, mostly because all the ingredients I needed were already in my house.

So, a bit of a breakdown:

Creaming butter and sugar.  This recipe doesn't actually use that phrase, which is nice for beginners (I remember years of running from the kitchen to check with my mom exactly what "cream" meant.  this picture might have been helpful.)

Adding the eggs gives this wonderful custard-y texture.  It's because egg yolks are an excellent emulsifier.  They allow the watery liquids (egg whites) to combine with fatty liquids (such as oil or butter).

After the milk is added, the batter takes on a slightly weird, almost grainy texture.  Don't be alarmed!

I used dried orange zest to give the cake citrus flavor.  It turned out pretty mild, with just a hint of orange.  I honestly would like more, so next time I think I'll try adding it sooner, like with the milk and/or flour, to give it more time to release its flavor before baking.


I baked in a 19x13-inch pyrex pan.  After baking, I trimmed the edges to give the cake a more boxy shape, then iced the cake with a thin layer of frosting (from a can, just something I had left over from another cake, actually).  I then broke out my fondant.  If you don't watch Ace of Cakes or anything like that, fondant is a thick, moldable cake covering.  Homemade (I'll try to blog about this later), it's created from marshmallows and powdered sugar.  I'm not exactly sure how they make it commercially, but consensus is that homemade tastes better.  If you want to buy some, I've found it in the cake-decorating (kind of by cards and party supplies) section of Wal-Mart.

I dyed a portion of my fondant light brown for the cover, and left a smaller portion white to make pages.  I started by applying the pages to 3 of the 4 edges, using a ruler and pizza cutter to get the right size and shape.  The cover was harder, because it is a much larger piece.  I ended up draping it over the whole cake, then trimming the edges.  To get the bottom cover, I cut thin strips of fondant and just laid them along the edge.  I scored the white pieces with a knife to give them page texture.

 Finally, I took a piece of Baker's chocolate, melted it, and used a folded piece of waxed paper to pipe it onto my cake, creating the title, by-line, and spine of the book.

Happy Birthday, Pride and Prejudice!

Oh!  It occurs to me a couple days later that I really ought to have mentioned storing fondant-covered cakes.   A normal iced or un-iced cake has a tendency to go stale, right?  So, I usually keep cakes in a cake-saver.  This isn't necessary with fondant-coevered cakes.  Just put plastic wrap against the exposed cake.  Otherwise your fondant tend to get moist.  Homemade fondant seems more prone to this than store-bought.  If it doesn't bother you, go ahead and store in a cake-saver anyway.  It doesn't affect taste, just texture.