Sunday, November 22, 2015

Harvest Pockets

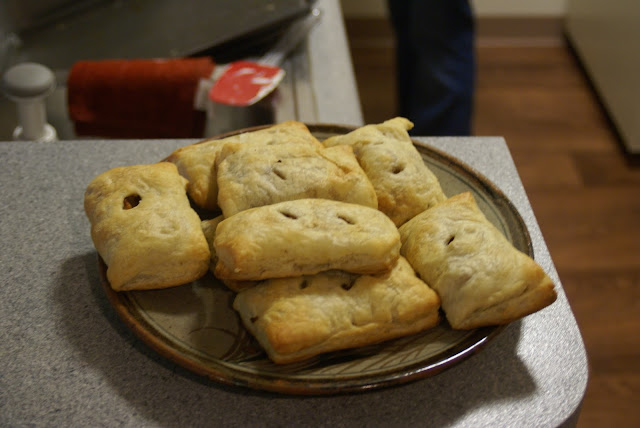
A few years ago, things came together in a brilliant flash of mental serendipity for me, and I created a Thanksgiving side dish that I have shared every year since.  It was inspired in by some sort of chestnut stuffing wellington I saw in the newspaper, Sandra Lee making homemade Toaster Strudel, and countless internet articles about alternative to mashed sweet potatoes with marshmallows on top (which I actually quite like).  I've tweaked it over time, but the original concept is solid.  This year I would like to share it with you in time for the holiday (barely).  


Savory Harvest Pockets
1 box frozen puff pastry dough
1 sweet potato
1 small squash (your choice; I typically eat acorn squash)
1 C pecans, chopped
cinnamon
clove
salt 
pepper
butter


Thaw the puff pastry according to package directions.

Cook your potato and squash.  If you're in a hurry, poke them with a fork and microwave them until tender.  However, it's nice to roast/bake, because you get caramelization of the sugars and that much more flavor.  To do this, peel and chop the potato, because it'll go faster that way, toss with a bit of oil, season with salt and pepper, and scatter over a caking sheet.  Bake at 375˚F until brown at the edges.  To roast the squash, cut in half, scoop out the seeds and pulp, and place skin-side down on a baking sheet.  Place approximately 1 Tbsp butter in the center hollow of each half.  Again, bake at 375˚F until flesh is slightly tender and browned at the edges.  As you take it out of the oven, poke the flesh a few times with a fork and swirl the butter around.  Allow the squash to cool, then carefully remove the skin and cut the flesh into pieces.

Toss the cooked squash and sweet potato pieces in a bowl with the pecans and a couple tablespoons of melted butter.  Season to taste with salt, pepper, cinnamon, and clove.  Be careful!  A little bit of clove goes a long, long way.  The mixture (which will be your filling) won't be sweet.

Take out the puff pastry, and cut the sheets into 4 sections each.  (I assume most puff pastry dough comes in the same size… I use Pepperidge Farm's puff pastry, though, if it makes a difference, and my sections are usually 5" by 8".)  You can widen the sections slightly with a rolling pin, if desired.  Place a portion of the filling on half of the section, top with a dollop of butter, leaving approximately half an inch of space on three edges (the imaginary line in the center doesn't count).  Put in more filling than you think you need.  Moisten the bare edges and fold the other half over (you should almost need to stretch it over), pressing to seal.  Slit the top of the pockets to allow steam to escape, and place on a baking sheet.  Repeat with remaining sections.  Bake at the temperature recommended on the puff pastry packaging (again, I'm not sure if this varies by brand or not) until lightly browned.

Some tweaks I've tried
Not Enough Filling!
To be healthier, you could probably leave out the butter.  Puff pastry tends to have a buttery texture on its own, but the flavor comes through better if you add real butter yourself.

If you prefer either squash or sweet potatoes over the other, obviously it's easy enough to omit one and increase the other.  You may also easily change out or omit the pecans.  

The biggest change I've made is that I've experimented with onions.  I like it a lot, because it kicks up the savory aspect, but if you choose to do this, alter the spices used-- think ginger instead of cinnamon.  

They've always gone over well, even with non-adventurous eaters who were just trying them to be polite, and/or friends who don't like sweet potatoes.  (I'll admit that I didn't necessarily say what was in them before they tried them.)  My husband's biggest criticism is that the puff pastry, by it's puffy nature, easily takes over.  Easy fix: just be aware that this is an issue, and pack in that filling.


Sunday, October 25, 2015

Chicken Crispies

I think most people would agree that the best part about a really well-prepared bird is the skin. Whether it be picked from the slow-roasted duck my host family made for holidays, or part of the crisped exterior of fried chicken leaving grease on everything at a picnic, as long as it's crispy, it's delicious.  Now, imagine you could have that delicious skin without all the extra bird.  It'd be like bacon, wouldn't it?!?  Well, I've been trying for a while, and I think I've nailed it.

Chicken Crispies
Chicken skin 
salt
pepper
sage

Ok, I'm sorry, but I don't have measurements.  How much skin you use depends on how you want to get your chicken skin, and everything else just gets sprinkled on top to taste.  I think the easiest way to get chicken skin is to buy chicken breasts with the skin on (and usually the bone still in).  They're pretty easy to cut off the bone, and usually you can just peel the skin right off.  If you're really going for it, get a whole chicken.  I usually go for both options, because I have recipes that use whole chickens, but I mostly just cook with chicken breasts; the skin gets bagged and frozen until I want to use it.

Start by laying out the chicken and slicing it into approximately 2-3 inch wide strips.  It will contract as you cook it, so go slightly larger than what you want to munch on.  Arrange the pieces on an ungreased cookie sheet (they'll grease themselves, and the little bit of sticking at the beginning helps keep it flatter), outside up, and sprinkle with salt, pepper, and sage.  Bake at 375˚F for 30- 40 minutes or until crisp and brown.  Transfer to a plate lined with a paper towel, and save the rendered fat, if desired, for other recipes (it's often called "schmalz", and can be used to sauté veggies for soup, along with butter in a crust for, say, a chicken pot pie, or any purpose you need fat for).


Tuesday, October 13, 2015

Good Scotch Cooking

I may be misremembering, but I'm pretty sure in one of the Little House books, Pa compliments Ma's "good scotch cooking."  It's her Scotch something.  I know, I KNOW, the term these days is "Scottish", unless one is referring to whisky.  But I'm trying to quote something positive.  Trying.  Anyway, I found a Scottish cookbook at an estate sale a while back, and decided it was high time (or highland time?…  Sorry!  I love horrid puns.) I made something from it.  The following is a simple recipe-- simple ingredients, simple cooking, and ultimately simple (but filling) flavors.

Chicken Stovies
1  frying Chicken, cut up
4 large Potatoes
2 large Onions (Don't use red.  It tastes fine, but looks odd.)
2 tsp Salt
1/4 tsp Pepper
1/3 C Butter
1 C chicken stock or broth

Peel and slice the potatoes into quarter-inch slices.  Peel and slice onions thinly.  Arrange alternate layer of chicken, potatoes, and onions in a heavy frying pan.  Dot each later with butter and sprinkle with salt and pepper.  Add the broth.  Cover tightly, bring to a pin, and simmer very gently for about a hour.

Rereading this as I post it, I wonder if I didn't misinterpret the preparation of the chicken.  I interpreted "cut up" as meaning into little bite-sized bits, but now I'm thinking, since it was listed (as I have it here) in the ingredients, not in the prep work, that maybe the recipe just means broken down into parts (wings, thighs, etc.).  That would also explain why it needs an hour to cook.  I guess I'll have to try that next time.

This ended up being a grand way of using up the dark meat of the chicken that I'm not wild about.  (Join me in heaving a giant sigh at the culturally determined preference for bland white meat that I can't shake.)  As you can probably see from the photos, though, the choice of red onion wasn't the best.  The leftovers looked really unappetizing.  It's a little under-seasoned for the taste of my family, either from time or culture.  I would certainly use more salt, and probably include some herbs for additional flavor.  But it's easy enough to cook and was satisfyingly filling. Not bad for a first venture into a cuisine known for meat boiled in a stomach.  Though to be fair, other cultures used entrails as cooking vessels.  The Scots are just more famous for it than everyone else.

Friday, June 12, 2015

Kashmiri Tea

I think my favorite thing about universities is the different people one has the opportunity to meet.  And the great part about getting to know people is that they can provide you with new ideas and insights, and sometimes even new foods.  My good friend Aggie (from China) introduced me to Chinese hotpot, one of my favorite things to eat.  This is not a blog about hotpot, though, so I'll skip going into raptures about it.  Sorry to have brought it up.  


Actually, while we were in school, I learned a lot about culture rather than food from another friend, Sidra.  She was Pakistani-American, and always willing to answer my questions about Islam (which she follows).  I'm not going to pretend that I had very deep questions, but I feel like I learned a lot nonetheless.  Now that we've gone our separate ways, we stay in touch via the internet, an I continue to learn from her.  Again, I'm dangerously close to going off on a tangent; long story short (TOO LATE!), through Sidra I learned about Kashmiri Tea.

Kashmiri tea is a type of Chai.  I imagine it originates in/near Kashmir.  (Wikipedia backs me on this.)  Surprisingly, it is pink in color, even though it's made from jasmine tea, a type of green tea.  According to my friend, one MUST use jasmine tea, or it won't work.  She's been very happy with the tea she gets at Teavana; I happened to have some Aggie had given me from China (I drink it very rarely, because I consider it the most precious of my teas).  The trick, from what I've read elsewhere, is really that you need to shock the leaves with cold, and that's what makes the green go pink.  But I'm getting ahead of myself.

Kashmiri Tea
2 Tbsp jasmine tea
1/4 tsp salt
1/2 tsp baking soda*
1 cinnamon stick
6 green cardamom
4 C milk
4 Tbsp sugar

Place tea, salt, baking soda (if using-- see notes) cinnamon stick, and cardamom in a pot with 4 C water.  Bring to a boil, reduce the heat, and simmer for 30 minutes.  Remove from heat.  Add 1 1/2 C cold water (let it sit with ice while you're finishing the simmer), and stir vigorously.  This is the science magic!  The cold water shocks the leaves, and this leads to the pink color the beverage takes on.  Add the milk and sugar.  Return to the pot, partially cover, and simmer for 10 minutes.  Be careful not to over-heat, or it will lose some of the unique pink tint.  Strain into cups, and serve sprinkled with finely chopped almonds and pistachios.

*Baking soda was present in every recipe I found on the internet, including the one my friend initially shared.  I'm not sure whether it helps with the color or not, but according to Sidra (and a resultant discussion in the comments of her post), it's entirely unnecessary, and  does not belong.  I honestly don't remember whether or not I added it.  I think not.

Tasty!  I found this to be a rich, well-balanced chai.  I especially love the pinkish color; it's not a bubblegum pink, but it was pinker before I heated the tea again than you see in the photo.  I liked the nuts on top, too, because it was like a little snack with my tea, somehow reminiscent of cookies being dunked.

I think this would have been best shared with friends; my husband doesn't care over-much for chai, so I drank it by myself over the course of a couple days.  It's best fresh, of course.  I reckon that's the point, isn't it.  To share tea with friends?


Saturday, May 23, 2015

Pinterest Beer Dip

Of course I have a Pinterest account.  Actually, I was a little late to the Pinterest party; a friend of mine looked at me like I was nuts and told me I would love it.  I kinda do.  But other times I feel a little overwhelmed.  I already have over a thousand recipes clipped and saved, a dozen or so cookbooks… do I really need to be "pinning" recipes online? Well, no.  But then I find things like "beer dip", and get really excited.  

My husband and I planned to have a Super Bowl party this year.  (Yes, I'm that behind on my blogging.)  Unfortunately, after ordering 50 wings and buying ingredients for three kinds of dip (plus dippers), the snow came.  Up until that point it had been a mild winter.  It was like the climate suddenly realized it was missing its chance, and dumped snow on us for 24 hours.  So much snow.  So the only people that made it to our place were our neighbors.  BUT!  That is not the point.  The point is, I tried out the beer dip recipe, as well as two others, also from Pinterest.  I thought this was most interesting, so I photographed it and made notes.  Wouldn't you know, it was the one we liked least.  It wasn't bad, it just needed quite a bit of tweaking.  I present below the recipe as I made it.

Beer Dip (adapted from ladybehindthecurtain)
2 bricks of cream cheese, softened
1 C beer
1 envelope ranch dressing seasoning
1/2 tsp beef bouillon granules
hefty pinch dill seed
small pinch crushed red pepper flakes
pepper to taste
1 Tbsp corn starch
2 C shredded cheese

In a mixing bowl, beat together cream cheese, beer, and ranch.  Stir in the bouillon, dill seed, red pepper flakes, and pepper.  Thicken by sprinkling over a thin layer of corn starch and stirring that in.  I use it to absorb some of the excess liquid without giving much flavor, and you want to sprinkle rather than just drop it in, or else you wind up with a clump of starch, and that's just yucky.  Stir in the cheese and chill until serving.  Serve with pretzels, veggies, or chicken wings.

First things first: if you follow the link to the original recipe, you'll see that only the beer, cheeses and ranch seasoning were called for.  You'll also see that I've tripled the amount of beer a half recipe would call for.  Because I wanted to taste BEER!  And I wanted more flavor.  I do agree with the author that it is plenty salty, and deliciously so, but otherwise, I think we have rather different palates.  Not a problem-- it takes all sorts to make a world-- but I needed to tweak things for myself.

My husband and I also agreed that we were not fans of the chunks of cheese in the dip.  I didn't care for the texture of it, and my husband found the flavor difficult as well.  Maybe less of it would be better, or finer shredded (microplane?), or even melted into part of the cream cheese.  But I think we might just cut it out next time. We wanted beer dip, with beer flavor; we didn't really need cheese.

Finally, thanks, Lady Behind the Curtain.  I would not have come up with this on my own.  


Thursday, May 14, 2015

Sometimes, less is more: Mac and Cheese

My mother-in-law sent my husband and I some pasta shaped like little UNL "N"s.  As a [former] Husker, I was very excited.  So excited that I planned great things for them, and got quite upset with my husband for suggesting that I could just serve them as a side with some other dish I was making.  No, I had big plans-- I was going to make a delicious, amazing, bursting-with-flavor, ultimate-comfort-food macaroni and cheese casserole.  Big Red Mac and Cheese!

I'll be honest up front; the following recipe was not quite as awesome as I had hoped.  I was trying to do too much, I think, and things just got lost in the shuffle.  At the end, I'll discuss a little more what I will do next time to improve.  This is not the ultimate Big Red Mac and Cheese.  But it was an experimental starting point.  And I think, ultimately, I'm better served by learning what I've done wrong.  For those reasons, rather than typing out the recipe in the typical format, I'll go through it in an almost stream-of-conciousness manner.  Hope that works for you.

Big Red Mac and Cheese Trial 1


I began with onions and the most boldly flavored meat I could think of: chorizo (which also happens to be reddish in color; seemed perfect to me).  I sautéed them together in a bit of bacon fat (more flavor!), then pulled out the sausage and set it aside.  I used the now chorizo-flavored bacon fat to make a roux (add flour), then gradually added cream and milk.  Finally, I melted in sharp cheddar, then seasoned with salt, lots of pepper, crushed red pepper flakes, and paprika for color.  I combined the pasta and chorizo in a greased casserole dish.  I topped the casserole with breadcrumbs and more paprika and cheddar, then baked everything until it was warm throughout and crusty on top.

So, on the surface, this seems like a great plan.  As I write it out, I still find myself wondering if it isn't just the greatest idea I've ever had.  Well, here's the rub.  The onion and chorizo thing didn't work quite as well as I'd have thought.  I think the biggest flaw was that I didn't really want the chorizo flavor throughout the dish like that.  It just sort of overwhelmed everything.  I think next time I'll sauté it up separately (I wanted it to have a nice browned surface-- yay Maillard reactions), and omit the onions.  I like onions, but I think my mistake here is that I was trying to pack in too much flavor, which meant that nothing popped out on the tongue.  I also think that a milder cheese, for the same reason, would be a good choice.  I would still top the casserole with sharp cheddar and crumbs, but I'd use more cheese-- a good thick layer of it, rather than a sprinkling-- and possibly a lighter application of seasoned breadcrumbs.  That way, I'd have a mellow, familiar, comforting flavor throughout, topped with gooey sharp cheddar with a nice crust of its own, heightened by crusty breadcrumbs, and flavorful, toasted chorizo every few bites.  I think it would also be nice to use a wider dish, not a casserole, giving me a better pasta-to-crust ratio.  Finally, for the sake of my husband, who is not a fan, I would cut back on the paprika.  (But not totally omit it-- goodness no!)  I'd probably mix it with the breadcrumbs and just leave it at that. 

So, moral of the story: as my husband says, KISS-- Keep It Simple Stupid.  You don't need to go nuts and pack in flavor at every turn to make a tasty dish.  


Thursday, April 16, 2015

Tofu-Carrot Soup… With Ginger!

I have come to the conclusion that soups are best "made-fresh yesterday".  A classic soup like chicken noodle is always better if you simmer it all day.  But cream soups often don't have long simmer times.  I'm not sure if this is an oversight, due to the puree and cream-adding processes (most of which happen at the end of cooking), or just a convenient shortcut we assume is Ok because there's a lot of other things going on with the recipe, like cream, that will make up for it.  Either way, the following recipe was mildly disappointing to me until I ate the leftover the next day and tasted all the flavor I had expected.

Unfortunately, I can't remember for sure where I originally came across this recipe.  I think it might've been an issue of Better Homes and Gardens.  All I know is I have it written out on a sheet of notebook paper and a vague memory of transcribing it from a magazine I found at church.  The original recipe called for mushrooms, which would've given some umami flavor, but I was pushing it feeding my husband tofu.  Mushrooms would've crossed the line.  I added ginger, because ginger and carrots are a wonderful combination.

Tofu-Carrot Soup
2 stalks celery
1 medium onion
2 cloves garlic
3/4 inch piece of ginger root
2 Tbsp vegetable oil
4 C chopped carrots
5-6 C chicken stock
1 (12.3 oz) package firm silken-style tofu
1 (5 oz) can evaporated milk
1 tsp chopped fresh thyme
~1 tsp dried, ground ginger (to taste)

Chop the celery, onion, garlic, and ginger.  In a soup pot (or dutch oven), heat the oil over medium heat, the sauté the celery, onion, and garlic until soft.  Add the carrots and stock, bring to a boil, the reduce heat and simmer, covered, for about 20 minutes, until everything is tender.

Cut up the tofu and add it and the evaporated milk to the soup.  Use an immersion blender and puree until smooth.  If you haven't got an immersion blender, cool the soup slightly, and process in a normal blender.  Stir in the thyme, and season to taste with ginger, salt, pepper, and worcestershire sauce.

Thin the sour cream with 2-3 tsp water.  Serve the soup hot, garnishing with green onions if desired.

As I said in the beginning, I was disappointed until I had the leftovers.  The ginger didn't come out as much as I had hoped, making the whole thing a tad lackluster.  But the leftovers!  They had wonderfully developed ginger flavor, which blended with and brought out the carrot.  

I will say I did a good job with the umami, though.  Worcestershire isn't as great as mushrooms (or fish sauce, possibly), but it did a nice job giving the soup a little more meaty flavor.  That's also why I chose to use chicken stock rather than vegetable broth-- well, that, and I generally have chicken stock on hand.

And I have to say, I liked the silken-style tofu.  As its name suggests, it has a smoother texture than normal tofu, which I suppose helps it incorporate smoothly into the soup, giving a creamy texture to the whole thing.  And it was wonderfully, surprisingly creamy.

It was yummy, and I would probably make it again.  I'd just make it a day ahead of time, let it sit in my fridge, and warm it up to serve it.  Actually, it wouldn't be bad as a cold soup for the summer, if you're into that kind of thing.  Was it my favorite soup?  Nah.  But it wasn't bad at all.